Eco-Visio resources
Creating new count locations
When creating a new "Counting Site" you can only extract or transfer data in a defined time period (e.g. you must have a start and end date). Therefore, we suggest you wait to create a "Counting Site" for a new count location after you have finished counting at it. Follow these steps to copy data from a portable counter with a serial number to a "Counting Site" on the location the data was collected. Read further to learn how to combine data from multiple portable counters into a "Virtual Site."
Create new "counting site"
- Log into Eco-Visio.net. If you don’t know your log-in info, contact your local equipment host.
- Use the search bar to search for name or serial number of the counter you are borrowing
- Click the name of the portable counter (e.g. "D2 | HRDC Pyro")
- Choose "Upload / Extraction" on the left side of the new window
- Choose "A new counter" under where it says, "Send data to:"
- Name the new counter starting with district number; city name; street, trail or intersection; and “PYRO” or “TUBE”. An example is “D2 | Bemidji | Baltrami Ave & 3rd St PRYO”
- Choose the period of time to extract by picking specific dates or a range from the drop-down menu of "Predefined Periods"
- Choose "Extract"
- Only check the bottom box in the pop-up box to "Keep a copy of extracted data on…”
- If the new counter doesn’t appear wait a while or click the "refresh" button in the lower right-hand corner of the web browser
- Choose the new counter
- Choose the modify icon next to "Description"
- Edit the "Setup Date" to be the day after your installation. This removes your "test" counts when you were verifying the sensor was operational and accurate.
- Add the "Coordinates" of your count site from a GPS device, or online map like Google Maps
- Edit "Comment" to provide a more precise description of the location and what cardinal directions "In" and "Out" represent people traveling:
- Choose "User Type" in the list to the left
- Click on the modify icon next to "User Type"
- Edit the "In" and "Out" to represent the cardinal directions you recorded (e.g. Northbound = "NB", Southbound = "SB", Northeastbound = "NEB", etc.)
- Choose the colored "Tags" that describe this count and location
- Click "Add a picture" and attach some photos that you took of the installation (site and counter)
Combine counters into a "virtual site"
Use the following steps and pictures to combine data from multiple counters into one site:
- Choose the gear icon in the upper right corner of the Eco-Visio window.

- Choose "Administration."

- Choose "Counting Sites" on the left of the window.

- Choose "Virtual Counter"

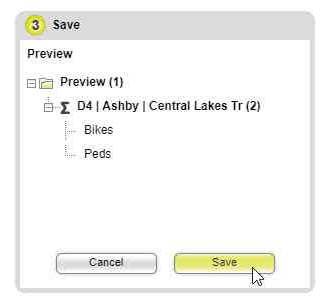
- Create a name for the site using the common naming convention (e.g. district, city name and street, trail or intersection) which looks like “D4 | Ashby | Central Lakes Tr” and choose the user type(s).

- Select from the list the counter you used and “Add it.”

- To create virtual counters that combine multiple directions or counters, choose "add a user type."

- Now, give this channel the name you intend for the second channel of the list (e.g. peds).

- After naming User Type 2 (which you just created), rename User Type 1 (e.g. bikes) and select the appropriate user type (e.g. Cyclists).

- Now create the formula for each channel by selecting a counter (or specific channel from a counter) and clicking ‘Add It’ or ‘Subtract It’ as desired. Your formula may include one channel or draw from many different sources.

- Finish by clicking "Save."